ericd
Member
- Joined
- Nov 4, 2025
- Messages
- 20
- Fluid Motion Model
- R-23 (Outboard)
- Non-Fluid Motion Model
- 1984 Skipjack Sport Cruiser
- Vessel Name
- shenanigans
Hey all, we recently took delivery of our R23. She is a very gently preowned 2020 R23 that we purchased from Boat Specialists in Ventura Ca. as they are our local dealer. This R23 came with most of the features we wanted except AC/Heat. So we decided on a few upgrades and I see a lot of people asking what upgrades should they do. So here is my list of what we have done so far and what we plan to do, and I will document more as it goes.
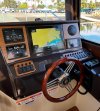
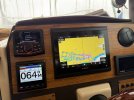
This pic is as we got her, day of delivery in Oxnard (where we are based)

First thing we did was the Seakeeper Ride system.. OMG this is amazing, and completely transforms the boat. I know its $$$$ but it was so worth the cost. We are in rough SoCal Waters and it keeps the boat amazingly stable, gets on plane faster and increases our milage.
Last weekend we had 3 people, dive gear for 2 with 6 tanks, full water, fuel, and all our stuff and we were doing 27kn at 2.6mpg in 3ft swell with chop on autopilot, not a problem at all. I will post videos later, but I was very impressed.. Best thing we could have done for this boat.


Electrical:
3x Victron 110ah AGM batteries for house power

 bluemarine.com
Renogy Shunt 300 and OneCore monitor

To run the AC off the AGM we decided to replace the stock 2000w inverter with a new 3000w Renogy with auto switch over and bluetooth. This allows us to run for short periods on the battery and for longer with the outboard running. Note, this unit fits mostly perfectly in place of the
original unit, however the upper port side bolt for the foot step under the seat where the window opens had to be shaved short and I put spacers under the inverter so it clears, you can also just remove that upper bolt if you choose. The 3 power switches need 20in oc clearance from
the port side of the boat to clear the inverter and this unit takes about 18" total length with connectors etc, so it fits just barely.

AC and Heat:
Webasto BlueCool 10K AC unit with softstart. This was a great upgrade as well, the bluecool uses the newer style touch screen interface and draws considerably less power then the OEM version that Fluid Motion installs. We did have to drill a new through hull and outlet port on the side. I covered this in another thread.
Exterior:
We added a few items that have made a huge difference.
Yakima EXO gear locker. This is a major transformation of storage for us. We are able to store ALL our dive gear on in here safely (and wet). We were able to put a few dive tanks on the rack (our O2 deco bottles) and all our gear in the locker
then we added a Yakima skinny warrior roof rack on the other side
Both of these racks fit nicely on each side of our Solar Panel which I did upgrade to the new Renogy ShadowFlux 200w
This panel allows some shadow (from the boxes) to obstruct the panel without loosing output. All three fit nicely on the roof with easy access. I set them back far enough so I can still open the roof vents. The EXO box required me to drill new holes for the front mount brackets in the box but that was very easy!
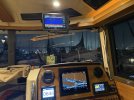
You can also see in this pic our Starlink Mini installed on the tower, we ran the line for this through a new grommit (factory style) on the starboard side of the roof bump oposite of the radar grommit. This was fed down the under the middle wood panel and then through the trim to the starboard side leather pillar cover (next to helm) and then into the helm power panels. We used a spare ACCY switch on the panel to turn it on and off (running it DC) and wired it to a open fuse in the panel on the back of the access door in the bathroom. And now since we have internet we put an AppleTV attached to the bedroom TV so we can watch movies! I put this behind the wood panel where the TV in teh bedroom is mounted and attached it with Velcro so its out of sight, it plugs to the power outlet in the bedroom where I put in a power strip (velcro to the same panel) so its all clean and gives us more ports for phone chargers etc!
https://photos.app.goo.gl/hA5FqQRCm9G8NLss5
 (video on me showing what we did to install it)

also since we removed the old trim tabs that had the under lights mounted to them (why guys, why??) We had to install new ones, so these are now transom mounted and we went with nice blue lights

Not sure why I dont have pics (I will post them later) we added a rear table on the deck. I put in a flush mount pole holder in the center cover, and a nice little plastic table with cup holders. All the flush mount and pole parts I got from TACO marine
amazon.com/dp/B0DGQRBZDM?ref_=pe_125775000_1044873430_t_fed_asin_title
I also bought a few battery powered deck lights as the deck is SOOO poorly lit on the R23.. These are great and I just clipped them to the underside of the bimini, easy and they last all night when charged.
Also not sure why my boat came with a 11lb claw anchor, but seriously! So that had to go and we put on a new Lewmar 22lb with about 60ft of chain, we go off boat diving with noone onboard often so this was very critical for us.
This pic is as we got her, day of delivery in Oxnard (where we are based)
First thing we did was the Seakeeper Ride system.. OMG this is amazing, and completely transforms the boat. I know its $$$$ but it was so worth the cost. We are in rough SoCal Waters and it keeps the boat amazingly stable, gets on plane faster and increases our milage.
Last weekend we had 3 people, dive gear for 2 with 6 tanks, full water, fuel, and all our stuff and we were doing 27kn at 2.6mpg in 3ft swell with chop on autopilot, not a problem at all. I will post videos later, but I was very impressed.. Best thing we could have done for this boat.
Electrical:
3x Victron 110ah AGM batteries for house power
Victron GEL and AGM Deep Cycle Batteries
Victron Energy Gel & AGM Deep-Cycle BatteriesSealed VRLA deep-cycle batteries engineered for demanding applications—combining maintenance-free reliability, outs...
bluemarine.com
Renogy Shunt 300 and OneCore monitor
To run the AC off the AGM we decided to replace the stock 2000w inverter with a new 3000w Renogy with auto switch over and bluetooth. This allows us to run for short periods on the battery and for longer with the outboard running. Note, this unit fits mostly perfectly in place of the
original unit, however the upper port side bolt for the foot step under the seat where the window opens had to be shaved short and I put spacers under the inverter so it clears, you can also just remove that upper bolt if you choose. The 3 power switches need 20in oc clearance from
the port side of the boat to clear the inverter and this unit takes about 18" total length with connectors etc, so it fits just barely.
AC and Heat:
Webasto BlueCool 10K AC unit with softstart. This was a great upgrade as well, the bluecool uses the newer style touch screen interface and draws considerably less power then the OEM version that Fluid Motion installs. We did have to drill a new through hull and outlet port on the side. I covered this in another thread.
Exterior:
We added a few items that have made a huge difference.
Yakima EXO gear locker. This is a major transformation of storage for us. We are able to store ALL our dive gear on in here safely (and wet). We were able to put a few dive tanks on the rack (our O2 deco bottles) and all our gear in the locker
then we added a Yakima skinny warrior roof rack on the other side
Both of these racks fit nicely on each side of our Solar Panel which I did upgrade to the new Renogy ShadowFlux 200w
This panel allows some shadow (from the boxes) to obstruct the panel without loosing output. All three fit nicely on the roof with easy access. I set them back far enough so I can still open the roof vents. The EXO box required me to drill new holes for the front mount brackets in the box but that was very easy!
You can also see in this pic our Starlink Mini installed on the tower, we ran the line for this through a new grommit (factory style) on the starboard side of the roof bump oposite of the radar grommit. This was fed down the under the middle wood panel and then through the trim to the starboard side leather pillar cover (next to helm) and then into the helm power panels. We used a spare ACCY switch on the panel to turn it on and off (running it DC) and wired it to a open fuse in the panel on the back of the access door in the bathroom. And now since we have internet we put an AppleTV attached to the bedroom TV so we can watch movies! I put this behind the wood panel where the TV in teh bedroom is mounted and attached it with Velcro so its out of sight, it plugs to the power outlet in the bedroom where I put in a power strip (velcro to the same panel) so its all clean and gives us more ports for phone chargers etc!
https://photos.app.goo.gl/hA5FqQRCm9G8NLss5

also since we removed the old trim tabs that had the under lights mounted to them (why guys, why??) We had to install new ones, so these are now transom mounted and we went with nice blue lights
Not sure why I dont have pics (I will post them later) we added a rear table on the deck. I put in a flush mount pole holder in the center cover, and a nice little plastic table with cup holders. All the flush mount and pole parts I got from TACO marine
amazon.com/dp/B0DGQRBZDM?ref_=pe_125775000_1044873430_t_fed_asin_title
I also bought a few battery powered deck lights as the deck is SOOO poorly lit on the R23.. These are great and I just clipped them to the underside of the bimini, easy and they last all night when charged.
Also not sure why my boat came with a 11lb claw anchor, but seriously! So that had to go and we put on a new Lewmar 22lb with about 60ft of chain, we go off boat diving with noone onboard often so this was very critical for us.
Attachments
Last edited: