Ice machine - RT 31 cb

AGLyme

“Sweetie” RT 31cb
Joined
May 15, 2024
Messages
175
Location
Lyme, CT
Fluid Motion Model
R-31 CB
Hull Identification Number
FMLT3129J213
Vessel Name
Just contracted to buy it, changing nm.
MMSI Number
000000000
I do not need an ice machine, would prefer to have a compartment for tools, etc.

Has anyone removed their’s?
Would appreciate removal tips and suggestions on how you created a shelf and hatch (door). Thank you in advance.
 
I would think very few people really need an ice machine on a Ranger Tug. Tools are likely to corrode and rust more when in a cockpit cabinet as opposed to the cabin.
 
I don’t fish… which is probably a big factor when having an ice machine.
Not a fan of drinking water out of the boat tank, including ice.
I’ll hang on to it for the next guy…
or, “Ice machine for sale - cheap”

Like all my projects I did in ‘24, I’ll just figure it out and post pics, mistakes and successes for info posterity.
 
Removed the ice maker as one of the first projects. It did not work. The seaflow 18x20 hatch door from Amazon fit the opening with just a little trimming. I agree with you about drinking the water, so I made up a bottled water dispenser in that area using a small pump and a filtered water spigot from Lowe's.
 
Removed the ice maker as one of the first projects. It did not work. The seaflow 18x20 hatch door from Amazon fit the opening with just a little trimming. I agree with you about drinking the water, so I made up a bottled water dispenser in that area using a small pump and a filtered water spigot from Lowe's.
 
Our ice maker stopped working (R31-CB). I just removed it (very easy) this week. Buy a STOP end to fit a garden hose. Turn off the water pressure and ice maker on your panel. Reach froward of the port side lazarette and unplug ice maker (hardest part of the project is to reach the plug) - use snips to cut the wire holder). Once unplugged and the wire holders snipped, the ice maker will easily come out of its space. Remove the water line from the rear of the ice maker and use the garden hose STOPPER to close off the water line. Tools required are a square bit, phillips head, wire cutter and garden hose stopper. I have shown the opening on a previous post. Now go to Boat Outfitters site and they will walk you through (you provide the raw opening dimensions) making a frame and door for that space (approx. $300). I am waiting for my door to arrive next week and will then install - easy peasy!
 
Capping a line at the end of a run is a bad idea as it can cause stagnant water and bacteria growth. It is preferable to cap it closer to where it tees off inside the cabin.
 
Great stuff… thank you all.
Looks like even I can do this project.
Will attempt in a month when it gets warmer here in CT.
 
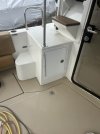
Done. Purchased a custom fitted hatch from Boat Outfitters. Decided on putting the hinge end towards the stern. Sometimes the salon door slams shut and I didn’t want it to slam on the hatch door by accident in the event the hatch was left open. The hatch is extremely well made, heavy materials. Far better than anticipated.
 
The above photo shows exactly what we did with our "dead" ice machine. Total cost was about 1 hour of labor and $300 for the new door/frame. To remove ice machine, FIRST make sure water pressure is turned OFF, then take screws out of frame, disconnect hose from rear of ice maker, disconnect plug (awkward location from the port side storage locker), then pull out ice maker out. Be prepared with the fitting (garden hose stopper) to plug hose end (when water pressure is turned back on you will not leak water). Go to Boat Outfitters web site to source the door/frame (they are very easy to work with).
 
I would think very few people really need an ice machine on a Ranger Tug. Tools are likely to corrode and rust more when in a cockpit cabinet as opposed to the cabin.
I have used Pelican cases for years. When I retired, I decided to try Harbor Freight cases similar to Pelican. I have split my tools into 4 separate cases and keep them in the starboard lazarette. 2 years and no rust.
 
Finished the inside of this excellent new storage area. The majority of the inside is gel coated, decided against painting the inside, no utility in doing so. Cleaned it out, got rid of the few chopped fiberglass “daggers” on the “stairs” underside and sanded… cut to shape (4) 12” x 12” square rubber interlinking tiles for the floor. For shock and sound proofing.
All the wide see through plastic jars full of repair items, tapes, screws, etc are in there… the tools in good cases + the makita cordless drill. Life preservers too.
Heaven.
PS, wife purchased a new fridge with - tah dah - an ice maker. Plenty of fresh ice for the boat this summer.
 
Back
Top