CaspersCruiser
Well-known member
- Joined
- May 11, 2016
- Messages
- 947
- Fluid Motion Model
- R-27 Classic
- Hull Identification Number
- FMLT2709G112
- Vessel Name
- Cookie
- MMSI Number
- 368203460
I recently had the engine mounts replaced on my 4BY2-180 powered 2012 R27. I had this done because the feet of the engine mounts that attach them to the stringers were corroding badly, especially the rear mounts and on the port side in particular. This corrosion resulted from poorly designed drains that discharge into the engine compartment that kept the mount feet constantly wet.
To accomplish the work, the technician did not completely remove the engine from the boat as do some shops. He lifted the engine just enough to gain access sufficient to replace the mounts. His reasoning was that he wanted to disturb as few boat/engine connections as possible. I’m sure there are plenty of good reasons to remove the engine entirely, but that was not the approach taken on my boat.
When I delivered the boat to the technician’s shop, after spending about 90 seconds looking over the mounts, the technician discovered that the port forward mount was not holding the engine at all. Not one bit. Zero. Zilch. Nada. The engine was merely floating up and down the bolt that was supposed to be securing the engine to the stringer.
Apparently, it was that way when the boat left the factory. The lower nut on the engine mount bolt acts as a jam nut for the upper nut that secures the engine to the mount. The lower nut was was all the way to the bottom of the bolt and jammed there. There were no witness marks that indicated that it had ever acted as a jam nut.
That port forward mount is not easily accessible or visible, but the technician instantly zeroed in on it like a laser-guided bomb. He worked as an A&P mechanic for Delta Airlines for a number of years and he said he’s used to working in tight spaces. From my perspective, on this this issue and some others, he certainly seemed to have a critical eye for details.
Before installing the new engine mounts, the technician sprayed them liberally with CRC Heavy Duty Corrosion Inhibitor. He fashioned some crude diverters to channel water to the bilge coming from drains that discharge into the engine compartment. Previously, this water ran along the top of the stringer and collected around the engine mount feet.
To my great relief, the stringers were solid and did not require any repair work due the water collecting around the engine mount feet.
After getting the new engine mounts installed, the technician spent a lot of time getting the engine/shaft alignment just right. Amazingly, the technician could find no deleterious effects in the drive train from the non-functioning port forward engine mount. The cutlass bearing was solid with no play at all. He did repack the stuffing box.
This is not a cheap endeavor. The engine mounts were $307 EACH from Mastry plus installation. The technician charged 16 hours labor for the mounts and some other work.
I’m the Ranger Tug owner whose boat got the thread started last year on the broken fuel pump clamp brackets. Several owners discovered that these hard to inspect items were broken on their boats as well. Hopefully, my boat is a one-off, but next time you’re in the engine space, try to get a look at those forward engine mounts and see if they’re actually holding the engine!
Here are some pictures:
This is the corroded foot of the port rear engine mount. To my surprise, the foot still had a fair amount of strength, but I’m glad I changed it.

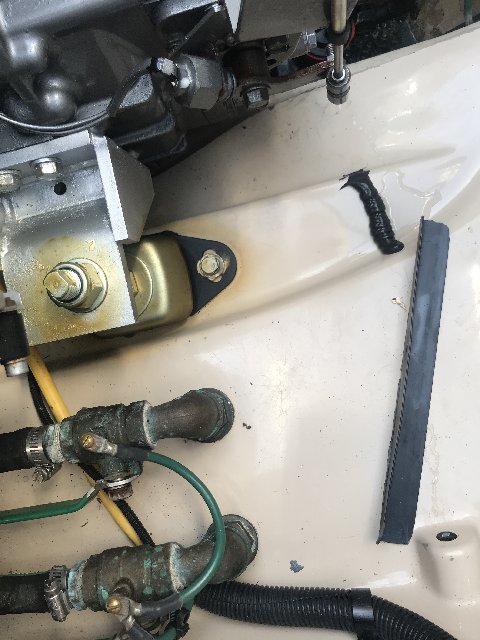
These are the water diverters the technician installed below the drain on the port side. The diverters are a piece of plastic L-channel and a bead of black silicone laid on the curving surface below it. The starboard side diverters are similar. The new port rear engine mount can be seen upper mid-left. The gold coloring on it is the corrosion inhibitor.
The mount in the foreground is the port forward mount that was not functioning as a mount. The jam nut can be seen all the way to the bottom of the bolt. The starboard right engine mount is in the background with the jam nut where it should be.

To accomplish the work, the technician did not completely remove the engine from the boat as do some shops. He lifted the engine just enough to gain access sufficient to replace the mounts. His reasoning was that he wanted to disturb as few boat/engine connections as possible. I’m sure there are plenty of good reasons to remove the engine entirely, but that was not the approach taken on my boat.
When I delivered the boat to the technician’s shop, after spending about 90 seconds looking over the mounts, the technician discovered that the port forward mount was not holding the engine at all. Not one bit. Zero. Zilch. Nada. The engine was merely floating up and down the bolt that was supposed to be securing the engine to the stringer.
Apparently, it was that way when the boat left the factory. The lower nut on the engine mount bolt acts as a jam nut for the upper nut that secures the engine to the mount. The lower nut was was all the way to the bottom of the bolt and jammed there. There were no witness marks that indicated that it had ever acted as a jam nut.
That port forward mount is not easily accessible or visible, but the technician instantly zeroed in on it like a laser-guided bomb. He worked as an A&P mechanic for Delta Airlines for a number of years and he said he’s used to working in tight spaces. From my perspective, on this this issue and some others, he certainly seemed to have a critical eye for details.
Before installing the new engine mounts, the technician sprayed them liberally with CRC Heavy Duty Corrosion Inhibitor. He fashioned some crude diverters to channel water to the bilge coming from drains that discharge into the engine compartment. Previously, this water ran along the top of the stringer and collected around the engine mount feet.
To my great relief, the stringers were solid and did not require any repair work due the water collecting around the engine mount feet.
After getting the new engine mounts installed, the technician spent a lot of time getting the engine/shaft alignment just right. Amazingly, the technician could find no deleterious effects in the drive train from the non-functioning port forward engine mount. The cutlass bearing was solid with no play at all. He did repack the stuffing box.
This is not a cheap endeavor. The engine mounts were $307 EACH from Mastry plus installation. The technician charged 16 hours labor for the mounts and some other work.
I’m the Ranger Tug owner whose boat got the thread started last year on the broken fuel pump clamp brackets. Several owners discovered that these hard to inspect items were broken on their boats as well. Hopefully, my boat is a one-off, but next time you’re in the engine space, try to get a look at those forward engine mounts and see if they’re actually holding the engine!
Here are some pictures:
This is the corroded foot of the port rear engine mount. To my surprise, the foot still had a fair amount of strength, but I’m glad I changed it.
These are the water diverters the technician installed below the drain on the port side. The diverters are a piece of plastic L-channel and a bead of black silicone laid on the curving surface below it. The starboard side diverters are similar. The new port rear engine mount can be seen upper mid-left. The gold coloring on it is the corrosion inhibitor.
The mount in the foreground is the port forward mount that was not functioning as a mount. The jam nut can be seen all the way to the bottom of the bolt. The starboard right engine mount is in the background with the jam nut where it should be.