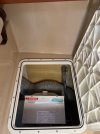
Custom deck mod

Trisailor

Well-known member
Joined
Jul 8, 2017
Messages
140
Fluid Motion Model
C-28
Hull Identification Number
FMLT2720H011
Vessel Name
Fancy Nancy (2011 R27)
Has anyone out there cut open the deck in front of the passenger seat for access to the AC unit? My R27 AC just quit and access to the electrical box on top of the AC unit is not possible due to the proximity of the deck over the top of it. It's also painful to crawl through the cave to get to the AC. I've already modified the entryway step for access to the front of the engine, so cutting the fiberglass and making access is not too intimidating. Currently I don't see any structural issues; but, also don't want to introduce a new series of squeaks and rattles. Any and all thoughts/comments are appreciated.
 
Yes. I had the air conditioning in my 2012 R27 worked on in 2018. The shop suggested cutting a hatch. It came in handy later on. The shop also moved the electrical control box from the top of the compressor to the aft side of the compartment. The hatch does not rattle or squeak.

 
Last edited:
I installed a hatch on our R 27 2012 and used the largest hatch that would fit the area. It looks like it was made there. I used a hole saw on the 4 corners first, so there were no stress areas on the corners. I have found an oscillating saw with an aluminum oxide blade to be the best to cut fiberglass. I have also cut out the step at the front of the engine, which makes the access to the front of the engine easy
 
Thanks. Haven't started cutting yet. Plan is to cutout deck and use cutout as hatch. I'll probably fashion some aluminum supports for the edges and screw the cutout in place. It doesn't have to be opened very often.
 

Thanks. Haven't started cutting yet. Plan is to cutout deck and use cutout as hatch. I'll probably fashion some aluminum supports for the edges and screw the cutout in place. It doesn't have to be opened very often.
The air conditioning hatch on my boat just rests in the opening on the stainless edges screwed onto the cutout. It weighs more than you might think. The hatch is removed with the flush pull on the inboard side of the hatch. It does not rattle or squeak at all. It’s been in place for seven years.

Edited to add: The opening cut was specifically sized to allow removal of the compressor should that ever become necessary.
 
Last edited:
Thanks again. The hatch is a much more elegant and easier solution than my original idea. Now to figure out what use to put the cutout piece to, other than dust collection in the garage.
 
I am planning on doing this on our R27 Classic too. Would some of you who have done this modification mind sharing a link or information about exactly what hatch replacement you used? Thanks
 
I am planning on doing this on our R27 Classic too. Would some of you who have done this modification mind sharing a link or information about exactly what hatch replacement you used? Thanks
And for that matter what hatch you used for the engine access step modification.
 
My engine step mod entailed cutting out the step and creating supports to keep the cutout in place. I used a combination of fiberglass and aluminum flat stock and aluminum angle bolted/epoxied in place to support the piece I cutout. It's held in place with flat head machine screws. I drilled and tapped the aluminum for 1/4-20 bolts. The FG flat stock has t nuts embedded for the bolts. Ill have to find or take some pics to put in my album.
The plan for the AC hatch entails embedding a plastic hatch (18x16) in a hole, cutout of the step, in front of the passenger seat. Ordered the hatch on Amazon (Great Lakes Skipper).
 
I had some leftover fiberglass and cut around the edges leaving enough to add a few screws. I installed the original hatch in the new faceplate.
It affords enough room for chest and shoulders but not much more!

1000006166.jpg
 
Thanks for the additional information and photos, it helps to see the instillation.
 
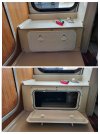
My step mod is a bit different. The entire step assembly is removed (5 screws, takes less than 2 min), then the rear bulkhead comes out. That gives relatively easy access to the front of the engine for belt or impeller changes. The dynamat addition was just to decrease noise and help seal the bulkhead, along with the neoprene and tape. Yes,I cut the rear bulkhead into two sections as recommended by a longtime contributor to this forum. Step Closed.JPGStep Open.JPG
 
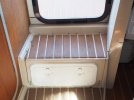
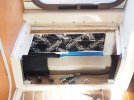
Forgot pic of the step cutout.Step 1.jpgStep 2.jpg
 
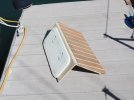
Finished deck cutout over AC unit. Deck in front of passenger seat cutout and hatch installed.IMG_1228.jpg
 
Sweet! Very well done! Will install mine next week when hatch arrives!
The deck is 1 inch honeycomb, sandwiched between a 1/4 inch (top) and 1/16 inch (bottom) layer of fiberglass, total thickness 1 5/16th inch. I covered the AC unit with a towel (fun adventure in the cave) and cutout the deck using a jigsaw with a metal cutting blade. A laminate cutting blade would work as long as it's long enough to extend through the deck on the upstroke. The two corners outboard had to be cut using a hole saw because the jigsaw couldn't make the turn for the rounded corners. Other than having the blade wander a bit once it was hot, the cut went pretty easy. The forward and seat bulkheads made a decent guide for the long side cuts. The saw table rode right against the bulkhead.
 
The deck is 1 inch honeycomb, sandwiched between a 1/4 inch (top) and 1/16 inch (bottom) layer of fiberglass, total thickness 1 5/16th inch. I covered the AC unit with a towel (fun adventure in the cave) and cutout the deck using a jigsaw with a metal cutting blade. A laminate cutting blade would work as long as it's long enough to extend through the deck on the upstroke. The two corners outboard had to be cut using a hole saw because the jigsaw couldn't make the turn for the rounded corners. Other than having the blade wander a bit once it was hot, the cut went pretty easy. The forward and seat bulkheads made a decent guide for the long side cuts. The saw table rode right against the bulkhead.
Fantastic info & detail…Very helpful indeed! Thank you!
 
Back
Top