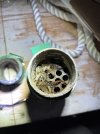
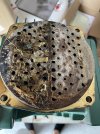
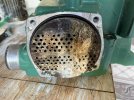
Been thinking about "cleaning the exchanger" short of an overhaul (full removal) which I did last time (high difficulty). Believe "inspection" of the fuel cooler, charged air cooler, and heat exchanger is still prudent and all possible without getting into the higher degree of difficulty necessary to remove each component of the heat exchanging system. In my opinion (not a mechanic, but mechanically inclined), the inspection and limited cleaning is not necessarily out of reach for someone who is also mechanically inclined. I would rate what I am proposing below as DIY-capable for the DIY-savvy. I'm going to run this gauntlet over the next couple of weeks. I'll report back how my plan worked out.
Fuel cooler is fairly simple, and if you don't disconnect the fuel lines you don't even need to reprime the fuel (which is not hard either). Simply remove the inlet hose coming from the saltwater pump and look for blockage (seaweed or impeller rubber parts) and remove. If you want to run something down each tube - a 20-gauge shotgun cleaning rod and brass brush would be the tool to use.
The charged air cooler rear plate can also be removed with four easily accessible bolts, and the tubes can be inspected from the rear of the engine. There is one large O-ring behind the end plate, then a spacer plate and one more large O-ring. You can remove and replace those O-rings - or reuse if they are in good shape (recommend coating with vegetable glycerin when reinstalling). If there is accumulated "stuff" you can likely remove it by using a gun barrel cleaning kit. The tubes are smaller than the fuel filter so a 22-caliber gun cleaning kit would likely be a better fit. The tubes are also about 12 inches long, but I have about 20 inches of space behind the charged air cooler and my generator set so plenty of room to run the cleaning rod back and forth. Remember of you spin the brush with a cordless drill, spin it in the correct direction so the brush does not spin itself off the end of the cleaning rod. Change out the zinc anode if there is one there and reinstall the end plate - book says 18 +-3 NM torque (13.3 +-2 lbf.ft).
Of course, the engine coolant temperature rises are due to the efficiency of the heat exchanger being diminished so doing the same procedure cited above on the heat exchanger is likely necessary to see a difference in engine running temperatures. However, the heat exchanger can be likewise inspected and cleaned without removing it from the engine (high difficulty). The forward plate of the heat exchanger can be removed much like the rear plate of the charged air cooler - it also has a large O-ring, a spacer plate and another O-ring. However, you will find that the saltwater pump pulley is in front of at least one of the four bolts for that plate so you will probably want to remove the drive belt and saltwater pump before removing the front plate of the heat exchanger. The heat exchanger tubes are about 12 inches long if you want to use the gun barrel cleaning method on them. I also don't know if those tubes line up exactly with the tubes in the oil cooler side of this unit to clean both at the same time - about 20 inches deep overall. Also, I only have about 12 inches of clearance between the heat exchanger and the forward bulkhead of the engine compartment - so the gun cleaning rod will need to be shorter than 12 inches long and be sectioned together to reach all the way through both heat exchanger tubes and oil cooler tubes. Same process for the O-Rings - replace or clean/reuse. Change out the zinc anode if there is one there and reinstall the end plate - book says 18 +-3 NM torque (13.3 +-2 lbf.ft). Reinstall the saltwater pump and drive belt and see what your engine coolant temps do.
OBTW, just to be complete - there is a transmission oil cooler further down the line before the water is flushed out through the exhaust elbow. It is at the rear of the engine...
Bemiller75, I'll PM the two exploded diagrams of the charged air unit and heat exchanger/oil cooler combo so you can see what I am talking about. I don't want to post VP manual material. I do advocate buying the VP Workshop Manual for the D4, D6 (Group 20-26). It has been a great source for seeing how our engines are put together.


