UPDATE - we sold our 2017 R-23 and purchased an 2025 R-27 - guess what - THE BEDDING FIT! The new mattress shape for the R-27 was a perfect fit for our R-23 bedding - and I am so so happy - I do NOT have to remake all the bedding!
After thinking about doing this for a year, we finally purchased the memory foam mattress topper and mattress cover, and it was my job to make the custom linens. I have a nice sewing machine, but I'm not a seamstress, more of an amateur quilter, and mender. I put it off, and put it off, and put it off, with the deadline for completion looming, I finally decided I had to try. I was fairly convinced I would ruin not only the mattress, but the cover as well. But I just did it.
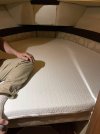
We have an R-23 VBerth, and I needed to make a pattern. I removed the pads from the boat and placed them on the floor in our home and made a pattern. I used sheets of butcher paper (3) taped together. It was stiff (which actually didn't end up being a bad thing). After the pattern was cut, I needed to account for the side pads so I didn't cut the mattress too big. I brought the pattern back into the boat, and cut a straight line down the middle so I could get it all the way in and not kneel on it (I taped it up after I brought it back in the house). This worked well, and I was able to get the pattern sized right. I spent a couple more days stewing over cutting the mattress before I actually did it. I purchased an electric carving knife (best money I ever spent for the job) and some silicone spray for the blades (which I didn't need at all).
I drew with sharpie the pattern on the memory foam mattress (about 4 inches thick). I laid it on our floor (we have a rug I was worried). It cut like butter, I only cut about 2/3 the way through going straight down and then did a second cut lifting off the floor so I didn't hurt the rug. It wa simple and fast, and didn't make a mess at all.
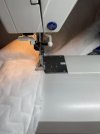
The mattress fit perfectly. So bolstered by that win (I didn't ruin it), I decided I could do the mattress cover and did roughly the same process of tracing the pattern, cutting it (about 2 inches bigger on all sides but the straight one) turning inside out and sewing. Now this, I made a super simple avoidable error. It was zippered on two sizes, and I literally turned it inside out while zipped up, cut off the zipper pull end and sewed it closed. I did a nice seam and a surger stitch and was so proud of myself before I realized my error. I had to sit for about an hour thinking about it. I seam ripped close to the straight end of the zipper and pulled it right side out through about a 3 inch hole. Then I seam ripped out the end of the zipper. The cording at that end had no teeth, and I was able to get the pull on, and wiggle and pull until the zipper was on. I hand stitched it back up and poof - all done. We put it in the boat and it fit quite nicely!
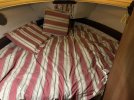
Again bolstered by that, I looked for linens I could use to make the comforter. I decided on an older pottery barn linen duvet cover. I cut it about 11 inches more than the pattern on all but the straight side). It had a nice stout linen fabric on one side, and a thick cotton on the other. Same deal, cut it out, and sewed it together, surging the edges. Now the interesting thing about the R23 V berth is that the bed on the straight side is at an angle. So rather than make more work for myself, I put the straight side of the striped pattern at an angle, which if laid perfectly flat, would make the stripe drift to one side, but given that It'll be kinda scrunched on the bed I figured 'meh' it's ok (and also very fitting for our boat - whose name is 'Wabi-Sabi', which basically means 'perfect in inperfection').
I then cut an old comforter up and just sewed it right side out (ugly sewing) and surged it and stuffed it inside the duvet cover. I did three safety pins at the pointed portion just to keep it in place, but it seemed to stay well inside without that (but I thought it made it a touch easier to load). The comforter was a full/queen and wasn't quite big enough on the very edges of the flat side - but thats ok too. All the other linens were king which was the perfect size to start with.
I had a couple pillow cases and some extra memory foam. I cut the angles of the sides of the foam and stuffed them in the cases and called it good. The king case was too big, so I just folded it over and sewed it, it doesn't need to be perfect, but functional and strong. I was pretty happy and the whole thing (except making the pattern which I did on a different day) was done in an afternoon. The cost was about 200 for the mattress and pad, and I did buy the carving knife (about 20 on amazon), and had purchased (very gently used) the pottery barn duvet a couple years ago (but never used it). The comforter was from an almost new cheap 'bed in a bag' we purchased just to get some linens on a bed upstairs, which we ended up getting rid of. But that was years ago and I have no idea how much it was (probably inexpensive). I'll be using a king sheet tucked in for the fitted sheet. I bought some sheet eleastic clips from amazon for $12 in case we need those, I don't know if we will.
Anyhow - I was very happy not to have to spend a couple thousand for custom bedding, and hope to give those of you debating this some hope. It can be done by an amateur. I think the best thing I did was spend time getting the pattern right, as I used it over and over, and it made everything fit pretty well.

After thinking about doing this for a year, we finally purchased the memory foam mattress topper and mattress cover, and it was my job to make the custom linens. I have a nice sewing machine, but I'm not a seamstress, more of an amateur quilter, and mender. I put it off, and put it off, and put it off, with the deadline for completion looming, I finally decided I had to try. I was fairly convinced I would ruin not only the mattress, but the cover as well. But I just did it.
We have an R-23 VBerth, and I needed to make a pattern. I removed the pads from the boat and placed them on the floor in our home and made a pattern. I used sheets of butcher paper (3) taped together. It was stiff (which actually didn't end up being a bad thing). After the pattern was cut, I needed to account for the side pads so I didn't cut the mattress too big. I brought the pattern back into the boat, and cut a straight line down the middle so I could get it all the way in and not kneel on it (I taped it up after I brought it back in the house). This worked well, and I was able to get the pattern sized right. I spent a couple more days stewing over cutting the mattress before I actually did it. I purchased an electric carving knife (best money I ever spent for the job) and some silicone spray for the blades (which I didn't need at all).
I drew with sharpie the pattern on the memory foam mattress (about 4 inches thick). I laid it on our floor (we have a rug I was worried). It cut like butter, I only cut about 2/3 the way through going straight down and then did a second cut lifting off the floor so I didn't hurt the rug. It wa simple and fast, and didn't make a mess at all.
The mattress fit perfectly. So bolstered by that win (I didn't ruin it), I decided I could do the mattress cover and did roughly the same process of tracing the pattern, cutting it (about 2 inches bigger on all sides but the straight one) turning inside out and sewing. Now this, I made a super simple avoidable error. It was zippered on two sizes, and I literally turned it inside out while zipped up, cut off the zipper pull end and sewed it closed. I did a nice seam and a surger stitch and was so proud of myself before I realized my error. I had to sit for about an hour thinking about it. I seam ripped close to the straight end of the zipper and pulled it right side out through about a 3 inch hole. Then I seam ripped out the end of the zipper. The cording at that end had no teeth, and I was able to get the pull on, and wiggle and pull until the zipper was on. I hand stitched it back up and poof - all done. We put it in the boat and it fit quite nicely!
Again bolstered by that, I looked for linens I could use to make the comforter. I decided on an older pottery barn linen duvet cover. I cut it about 11 inches more than the pattern on all but the straight side). It had a nice stout linen fabric on one side, and a thick cotton on the other. Same deal, cut it out, and sewed it together, surging the edges. Now the interesting thing about the R23 V berth is that the bed on the straight side is at an angle. So rather than make more work for myself, I put the straight side of the striped pattern at an angle, which if laid perfectly flat, would make the stripe drift to one side, but given that It'll be kinda scrunched on the bed I figured 'meh' it's ok (and also very fitting for our boat - whose name is 'Wabi-Sabi', which basically means 'perfect in inperfection').
I then cut an old comforter up and just sewed it right side out (ugly sewing) and surged it and stuffed it inside the duvet cover. I did three safety pins at the pointed portion just to keep it in place, but it seemed to stay well inside without that (but I thought it made it a touch easier to load). The comforter was a full/queen and wasn't quite big enough on the very edges of the flat side - but thats ok too. All the other linens were king which was the perfect size to start with.
I had a couple pillow cases and some extra memory foam. I cut the angles of the sides of the foam and stuffed them in the cases and called it good. The king case was too big, so I just folded it over and sewed it, it doesn't need to be perfect, but functional and strong. I was pretty happy and the whole thing (except making the pattern which I did on a different day) was done in an afternoon. The cost was about 200 for the mattress and pad, and I did buy the carving knife (about 20 on amazon), and had purchased (very gently used) the pottery barn duvet a couple years ago (but never used it). The comforter was from an almost new cheap 'bed in a bag' we purchased just to get some linens on a bed upstairs, which we ended up getting rid of. But that was years ago and I have no idea how much it was (probably inexpensive). I'll be using a king sheet tucked in for the fitted sheet. I bought some sheet eleastic clips from amazon for $12 in case we need those, I don't know if we will.
Anyhow - I was very happy not to have to spend a couple thousand for custom bedding, and hope to give those of you debating this some hope. It can be done by an amateur. I think the best thing I did was spend time getting the pattern right, as I used it over and over, and it made everything fit pretty well.
Attachments
Last edited: