R23 electrical system overhaul - follow along

freedomvango

Well-known member
Joined
Oct 13, 2024
Messages
121
Location
jacksonville, fl
Website
www.freedomvango.com
I imagine this is going to be a lengthy post in numbers. I will document as I go so you can see if this, too, is something you want to tackle.

Problem - 2022 R23 with AGM Batteries, ac and heat that only works on shore power, single solar panel

Solution- Upgrade entire power system to support faster shore power charging, lithium charging from outboard, larger solar array, reconfigure breaker panel to run through larger inverter/charger

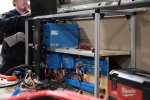
Parts list (abridged)-
-3 320 AH Dakota lithium batteries (what is current day used)
-1200w solar array on a custom rack that extends over Bimini
-Orion DC to dc charger for charging from outboard
-2x Victron 100/50 solar controllers
-multiplus 12/3000 inverter charger
-Cerbo GX and touch 70 for monitoring
-smart shunt IP67
-Ip22 charger for starting and thruster
-Class T fuse and holder
-random bus bars, wire, and the like.

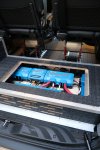
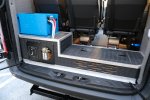
The plan is to put the batteries and such where the factory ones are on the port side locker. This should work for r23 and 25s
Remove the charger, the ACR for house batteries,s and other unneeded items and replace them with those above
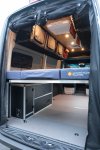
The inverter will be a little fun, but I think I can shove it where the factory inverter is. However, I will have to build a bezel to extend the panel a bit into that berth area to make depth for the inverter, but overall, it's not too hard. I will also most likely remake the facia panel on the CNC to rearrange the battery switches to under the AC Panel instead of beside it and slide things around for better packaging.

All the parts are at the shop except for the batteries which should show up by the end of the year.
While we are traditionally van builders, I love the ranger tug because its a van on a boat. fits right into my use case! Excited to start working on our 23.
 

Attachments

  • DSCF2830.JPG
    DSCF2830.JPG
    2.7 MB · Views: 46
  • DSCF2820.JPG
    DSCF2820.JPG
    2.6 MB · Views: 45
  • DSCF6677.JPG
    DSCF6677.JPG
    3.2 MB · Views: 43
  • DSCF0122.JPG
    DSCF0122.JPG
    3 MB · Views: 45
Spent the first day with the r23 doing phase one of our electrical overhaul

Waiting on my lithium batteries to come in, so decided to tackle, arguably, the most labor intensive portion. Change out the inverter and battery charger to an inverter/charger and starting and thruster charger

I used a Victron multiplus 3000kva 2, and an ip22 charger with three outputs.

Had to disassemble the whole power area. I did cut it in two pieces to make servicability easier. Put a metal flange on it so when it's all screwed back in it lines up nice.

Went from shore power to elci, elci to ac in on the inverter, ac out 1 from the inverter to the old shore power in (moved labels around), and then that powers the panel as if on shore power. Ac out 2 which only works on shore power, is dedicated to the battery chargers for starter and thruster and automatically engage about a minute after shore power

Upgraded all inverter wiring to 4/0 as well and will retrofit the system as I make other changes.

Inverter/charger are currently derated so not to overload existing bottlenecks in the wire.

Always make sure you label every new wire that goes in!
Untitled by Grant Wilson, on Flickr
 
Last edited:
Nice work! Is the IP22 just for charging the starter and thruster batteries?
 
Looks Great..I'm collecting parts now to upgrade to Victron Lithium

Already installed
CerboGx
MPPT 100/30
Orion XS DC-DC
Shunt

Upgrading
Lynx BMS NG
2x200 Victron NG Lithium
Multiplus 12/2000
IP 43 PSC(1+1) charger for Start/Thruster

Went with the IP43 versus the IP22 because of the VE Direct connection and the ability to display Start and Thruster Voltage on the VRM Display

Following your setup for advice and recommendations on install

-Craig
I would elect to pass the 12/2000 and go 3000. mainly for faster shore power charging at 120 vs 80 amps.

My plans on the monitoring are to use smart shunts on the thruster and starting which will give me more power usage data for the battery as well as up-to-date status of the SOC and trends.

looks like you are off to a good start. Where did you mount your touch screen?
 
Yes, with 960ah you will need the 120 amp charger. I just use a ipad pro 12" to display VRM when needed. I use it for multiple displays including chartplotter, internet, tv and Sionyx Nightwave CameraIMG_3211.jpg
 
Yes, with 960ah you will need the 120 amp charger. I just use a ipad pro 12" to display VRM when needed. I use it for multiple displays including chartplotter, internet, tv and Sionyx Nightwave CameraView attachment 24505
you could also (if you had a can to nmea) pipe right into the garmin. Another reason I'm using the cerbo
 
I used to have the 8610xsv wired directly to the Cerbo, I just wasn't happy with the display on the Garmin MFD. I am really impressed with the new VRM DashboardScreenshot 2024-12-26 192749.jpg
 
I’m currently working on videos to track progress, but for this post, let’s focus on solar energy and my vision for its future!

Living in Florida and wanting to run the air conditioning unit during the summer, I aim to generate as much power as possible at any given time. With that in mind, solar energy is a key solution. I currently have 1,000 watts on one of my vans and 1,200 watts on the other. With this setup, I can run the air conditioning almost entirely on a sunny day, and at the very least, significantly supplement it on non-summer days. Every little bit helps keep me off the shore plug!

I’ve designed and built a proof-of-concept rack to house three 200W panels for testing. These are SunPower panels, custom-built for robots on a honeycomb structure to be extremely lightweight, weighing less than 10 lbs each. The rack itself is relatively simple, using standard solar brackets for mounting and not intended to be permanent. I opted for this design to install the panels practically and test real-world issues, like moving them to the bow. Overall, I’m very pleased with the results. This weekend, I plan to finish the new rack, which will hold six of these 200W panels, extending over the rear bimini with two support bars connecting to the transom handholds. I hope to install it next week.

I’ve decided to run each 600W array into a Victron 100/50 controller to minimize shading issues. This will also allow flexibility if I want to use suction mounts (seasuckers) to place a bike or other equipment on the rack without compromising the solar system’s performance. Additionally, there will be an option to use only 600W of solar on the rack, freeing up space above the bimini for storage lockers or similar uses. Maximizing the available space above the boat is a priority for me.

Lastly, I ran new 6 AWG wire from the panels to the solar controller, which is mounted behind the electrical panel where the old inverter was located. There’s enough room for both the solar controller and the inverter!

Without further blah blah here are the pics 🙂
Untitled by Grant Wilson, on Flickr
 
Back
Top