2013 R27 D3 Timing Belt Change

athenahigh

Member
Joined
Sep 8, 2023
Messages
10
Fluid Motion Model
C-28
Hull Identification Number
FMLT2722A313
Vessel Name
Be Here Now
MMSI Number
316026314
Well, I finally did it!
After three attempts at replacing my timing belt pulling the engine, I can finally say I got it done!
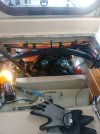
This time, I went all in and cut out the step and wow, what a game changer. The access to the front of the engine was incredible. Once that step was out of the way, the whole job only took about five hours start to finish.
I ended up buying two tools to get it done, and both were worth every penny. Cutting out that step not only made the timing belt swap so much easier, but it’s going to make future job like changing the other belts, water pump impeller, and tensioners a breeze.
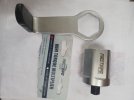
I’ve attached a photo of the step I cut out and the two tools I picked up. The torque multiplier was a huge help, especially since one of the nuts was torqued to 221 ft-lbs. I also acquired a copy of the shop manual for the D3 with step by step instructions.
Best part, I didn’t have to remove any pipes or the bilge pump—just the timing belt cover. Couldn’t be happier with how it turned out!
 

Attachments

  • 1000017933.jpg
    1000017933.jpg
    778.6 KB · Views: 71
  • 1000017932.jpg
    1000017932.jpg
    876.2 KB · Views: 61
  • 1000017594.jpg
    1000017594.jpg
    1.7 MB · Views: 65
  • 1000016971.jpg
    1000016971.jpg
    158.2 KB · Views: 64
Congratulations! This is a project on my list. When the top of the step is installed how is it secured? I see the latches for the front of the step. What was the other tool, not the multiplier, what source and how did you use it? Thanks for posting this, it's a great help.
 
IMG_0492.JPGIMG_0497.JPG

Fully agree that the step modification is the key to success. We opted for a different approach for the modification. Just food for thought.

I confess that we got a Volvo tech to do the belt change but with the step modification it went fast and smooth so the mod paid for itself.
 
Beautiful modification! Where did you get the nice piece of teak for the top step? Really nice, looks factory.
 
Beautiful modification! Where did you get the nice piece of teak for the top step? Really nice, looks factory.
Thanks. There is a place on the west side of Sidney BC that has all kinds of special wood.
 
Thanks, one more question. What tool did you use to cut out the top step? The radius at the back looks pretty tight for a jig-saw.
 
Sorry, but one last question. The black round items on the lower left of the head door and on the circular hatch on the front of the step. They look like they would mate up. Are they bumpers, or perhaps magnets to hold the door open?
 
Drill first. Here’s the mock-up
Sorry, but one last question. The black round items on the lower left of the head door and on the circular hatch on the front of the step. They look like they would mate up. Are they bumpers, or perhaps magnets to hold the door open?
IMG_0468.JPG

This was the pre-marking. A hole saw for the corners. I don't remember whether we used 2" in the end. I confess I had lots of help with this project!

Yes, the black discs are magnets. I keep a dehumidifier running rear round and it's good to have the head door open.
 
Congratulations! This is a project on my list. When the top of the step is installed how is it secured? I see the latches for the front of the step. What was the other tool, not the multiplier, what source and how did you use it? Thanks for posting this, it's a great help.
To secure the step, I attched a piece of wood to the firewall that supports the step when you walk on it. Also the latches stop it from moving horizontally. The other part is a 885819 Counterhold. I googled it and found it online for about $100. Just changed my water pump and belts yesterday a it was a breeze.
 
Thanks, one more question. What tool did you use to cut out the top step? The radius at the back looks pretty tight for a jig-saw.
 
I used a universal saw. The corners are tight. I used a drill bit to cut the corners. You can get bits that also cut horizontal. Very little dust with the universal saw. My wife held the shop vac as i cut it.
 
Thanks to both "Chimo" and "athenahigh", Y'all have made this project much more feasible for me. I just love this TugNut community. Thanks again!
 
Back
Top